Wednesday, 16 October 2019

Execute commands remotely on AWS EC2 linux instance in Python

import paramiko

##Initiate SSH Connection
ssh = paramiko.SSHClient()
ssh.set_missing_host_key_policy(paramiko.AutoAddPolicy())
try:
ssh.connect(hostname=<hostIp>,port=<port>,username=<username>,key_filename=<keypath>)
print("Connection Successfully Established!")
except paramiko.AuthenticationException:
print("Authentication Failed!")

#Execute Commands
ssh.exec_command("ls -lst")

Remote connection to AWS EC2 Linux Instance in Python

import paramiko

##Initiate SSH Connection
ssh = paramiko.SSHClient()
ssh.set_missing_host_key_policy(paramiko.AutoAddPolicy())
try:
ssh.connect(hostname=<host_ip>,port=<port>,username<username>,key_filename=<keypath>)
print("Connection Successfully Established!")
except paramiko.AuthenticationException:
print("Authentication Failed!")

Logging module in python

import logging

##Logging Basic Configurations
logging.basicConfig(filename="Scriptlog.log" , format='%(asctime)s %(message)s', filemode='w')
logger = logging.getLogger('logger')
logger.setLevel(logging.INFO) #Log Level can be changed to DEBUG, ERROR, WARNING etc.

##Put below logger where you want logging
logger.info("Python script has been completed")


Python Code to Stop AWS EC2 Instances Using Filters


import sys
import boto3
from botocore.exceptions import ClientError

region = 'xx-east-x'

InstanceList = []

try:
        ec2 = boto3.client('ec2', region_name=region)
except Exception as e:
        print(e)
        sys.exit(1)

response = ec2.describe_instances(
        Filters=[{
'Name': '<tagname>',
'Values': ['<value>']
},
                {
                        'Name' : 'instance-state-name',
                        'Values' : ['stopped']
                }]
)
#print (response)
for reservation in response['Reservations']:
for instance in reservation['Instances']:
InstanceList.append(instance['InstanceId'])

#print InstanceList
for instanceid in InstanceList:
startec2 = ec2.start_instances(InstanceIds=[instanceid])

Python Code to Start AWS EC2 Instances Using Filters


import sys
import boto3
from botocore.exceptions import ClientError

region = 'xx-east-x'

InstanceList = []

try:
        ec2 = boto3.client('ec2', region_name=region)
except Exception as e:
        print(e)
        sys.exit(1)

response = ec2.describe_instances(
        Filters=[{
'Name': '<tagname>',
'Values': ['<value>']
},
                {
                        'Name' : 'instance-state-name',
                        'Values' : ['stopped']
                }]
)
#print (response)
for reservation in response['Reservations']:
for instance in reservation['Instances']:
InstanceList.append(instance['InstanceId'])

#print InstanceList
for instanceid in InstanceList:
startec2 = ec2.start_instances(InstanceIds=[instanceid])

Monday, 29 April 2019

How to install django on Windows?

1. Download get-pip.py from pip official download site
    https://bootstrap.pypa.io/get-pip.py

2. Run pip installation using command "python get-pip.py"


3. Install django by running below command "pip install django"


4. installation is successful, check django version to confirm installation using below command.
    python -m django --version

5. Create your first project using below command. It will create project folder with name "mysite" under given location.

    django-admin startproject mysite 

Saturday, 8 September 2018

Benefits of Multi threading

  • Maximum Throughput: Maximum throughput can be achieved using multiple threads fueling application performance which can be achieved using multi-threaded application and CPU multiple cores.


  • Parallel Processing: In multi-threading environment task gets processed in parallel mode which improves application capacity to process more requests volume.


  • Better User Experience: Multi-threading undoubtedly provides better user experience by enhancing application performance capability.

Creating index in oracle database | Database Performance tuning

Indexes are used to quickly locate data without having to search every row in the database table each time a database table is accessed.
Indexes can be created using one or more columns of a database table, providing the basis for both rapid or random lookup and efficient access of ordered records.
Index is a data structure that improves the speed of data retrieval operations on a database table.

How to create index:
  create index <index_name> on <table_name> (<col1>,<col2>,...);

So, if you want to create index on color column on your paint table and call it paint_color_i, SQL would look like below:
  create index paint_color_i on paint (color);

You can also include more column to index like below:
  create index paint_color_i on paint (color,type);

How to configure SSH Server on Ubuntu

1. Installing SSH Server:
  • openssh-server package can be found in linux software center. Alternatively open terminal and run below command.
          sudo apt-get install openssh-server

2. Enabling SSH on Ubuntu:
  • Once ssh installed on the machine create backup of sshd_config file with sshd_config.defaults filename to restore in case configuration is messed up.
       sudo cp /etc/ssh/sshd_config /etc/ssh/sshd_config.defaults
    
    Change permission of defaults backup file using chmod command given             below.
    sudo chmod a-w /etc/ssh/sshd_config.defaults

3. Restart/Reboot SSH Server
  • For Ubuntu 14.04 and below version
    sudo restart ssh
  • For Ubuntu 15.04 and above version
    sudo systemctl restart ssh

Now you will be able to connect to ubuntu using any ssh client application like PuTTY, Bitvise, winscp etc. Just follow below steps.
  • Check ip details using ifconfig command.
  • Use inet addr address and login to ssh client using user and password.


Monday, 29 January 2018

How to handle JSON request in LoadRunner(LR 12.53)

JSON request can be handled using lr_eval_json function in LR 12.53.
lr_eval_json parses a JSON string, creates a JSON object, and stores the handle of the object in a parameter.
This function is not recorded. You can insert it manually into your script.

Step1: Capture JSON request from the response body using web_reg_save_param.

Step2: Input captured parameter of json parameter and save it in a string using below lr_save_sting function.
        lr_save_string(json_input, "JSON_Input_Param");
Step3: Create a Json object using above json string.
 //Create a Json object from a string.
 lr_eval_json("Buffer={JSON_Input_Param}",
              "JsonObject=json_obj_1", LAST);
 //Create a Json object from a file.
 lr_eval_json("Buffer/File=store.json", 
              "JsonObject=json_obj_2", LAST);

Step4: Using below function values can be fetched from json object and used in the scritps.
      lr_json_get_values("JsonObject=json_obj", 
                         "ValueParam=val", 
                         "QueryString=$.val", 
                         "SelectAll=Yes", 
                         LAST);
Values will be stored in parameter like val_1, val_2, val_3.........

Alternate way:
Using web_reg_save_param_json function.
The web_reg_save_param_json function supports array type parameters. When you specify SelectAll=Yes, all the occurrences of the match are saved in an array. 
Each element of the array is represented by the ParamName_index.
In the following example, the parameter name is A:
web_reg_save_param_json("ParamName= A", "QueryString=$..arguments.additional_context[0].name", "SelectAll=Yes", LAST );
The first match is saved as A_1, the second match is saved as A_2, and so forth. You can retrieve the total number of matches by using the following term: ParamName_count.
For example, to retrieve the total number of matches saved to the parameter array,
use: TotalNumberOfMatches=atoi(lr_eval_string("{A_count}"));
web_reg_save_param_json is not recorded. You can add it manually to a script.
Argument Description
ParamName The name of the parameter to store the returned value. If the parameter does not exist, it is created.
QueryString The path of the value to save. For the syntax of the query string, see Json Path on GitHub.
SelectAll Optional: If SelectAll=Yes, all the occurrences of the match are saved in an array. See Saving Multiple Matches below in this topic.
List of Attributes For details of each attribute, see Attributes for Save Parameter Registration Functions. Attribute value strings (e.g., "Search=body") are not case-sensitive. See the Restrictions.
SEARCH FILTERS Specifies the sections of the buffer to search for the string in. See Search Filters for Save Parameter Registration Functions. See the Restrictions.
LAST A marker that indicates the end of the argument list.

Thursday, 11 January 2018

Enable/Disable iptables firewall in linux

Enable/Disable iptables firewall in linux:
# /etc/init.d/iptables save
# /etc/init.d/iptables stop
# /etc/init.d/iptables start

On Boot:
# chkconfig iptables off

# chkconfig iptables on

Thursday, 18 May 2017

SQL Plus Important Commands

How to Connect to sqlplus?
Type "sqlplus" in terminal and enter user-name and password.
On successful login below information will be displayed along with version information
Connected to:
Oracle Database 11g Enterprise Edition Release 11.2.0.4.0 - 64bit Production
With the Partitioning, OLAP, Data Mining and Real Application Testing options

How to exit sqlplus?
Type "quit " to exit from sqlplus

How to login using command line arguments?
Type sqlplus system/pass (It opens a connection to our local database)
To login to schema use below command
sqlplus schemaname/password@SID(Servicename defined in tnsnames.ora file)

How to check location of sqlplus?
Type which sqlplus

How to check sqlplus environment variable?
Type echo $PATH

How to check Oracle SID?
Type echo $ORACLE_SID

How to Start and stop the listener?

Command: lsnrctl using this command we can start/stop the listener by tying start/stop command

Linux Performance Monitoring

Friday, 29 January 2016

Resolving DNS Caching Issue while Performance Testing Web Services.


How to disable DNS Caching in Load Runner to avoid misleading performance results while testing Web services.

Protocol Type:

Web Service


Scenario/Flow:

Load Runner-->WIP(Global Load Balance)-->VIP(Local Load Balancer)-->Host(Web Logic Server)

Note: WIP is a DNS service, the DNS reply can be cached locally and some load tests could give misleading results like the response time of web service request differs from the actual response time.


Issue:

Request was not reaching to WIP and it was not asking the WIP for DNS resolution or DNS lookup(translation of the unique IP address or domain of host in textual format to an IP address).


Symptom:

Local DNS Caching(Applications can cache the DNS reply, as can local DNS servers).


Resolution:

As the Web Service protocol in Load Runner does not have any option to disable DNS caching, we need to create a script using Web HTTP/HTML protocol by converting all your SOAP or JMS calls using web_custom_request in Web HTTP/HTML protocol. Once the migration is done, go to Runtime Setting > Click on Preferences under Internet Protocol group>Click Options button>Change the DNS Caching option to NO under General Tab(by default it is set to YES).


Monday, 26 October 2015

Database Performance testing using JDBC connection through Jmeter

Follow below steps to configure the Jmeter to connect your database.

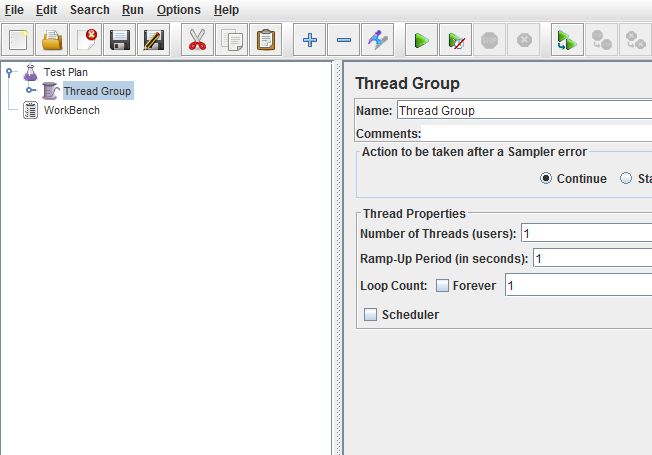
STEP 1: Open a new Test Plan and add a Thread Group in it.

STEP 2: Add a 'JDBC Connection Configuration' from 'Configuration Element' menu into the Thread group.


STEP 3: Configure the 'JDBC Connection configuration' with respective database/tables as described below.

*Variable Name : We need to create a name for the JDBC pool. So that we can reference the pool name while executing a SQL query.

*Pool Configuration : Need to provide the number of concurrent connection in 'JDBC POOL'. (we used just 5, which means we can run just 5 parallel users only). Need to specify the pool timeout value too.

Database Connection Configuration : This is the place we need to provide our database name, host and port.
The access credentials needs to be added into it.

JDBC Driver Class:
Jmeter does not come with mysql JDBC driver. We need to download the latest JDBC mysql driver from Oracle site and hold a copy in Jmeter/bin folder. Mention the driver name in this column.
Only if we have a valid driver name, we can execute the query.

STEP 4 : JDBC Sampler
Add a JDBC sampler from ADD > Sampler > JDBC Request.


STEP 5: Add the SQL


* Give the sampler a valid name to be referenced in results

* Provide a valid Variable pool name, which we created in STEP 3 ( 'JDBC POOL')

* Type your SQL Query in the space provided.


STEP 6: Add a View Results Tree to observe the results.


STEP 7 : Para-metering the SQL

Create a list of parameters to be used in SQL in a 'User Defined Variables' configuration.


Refer the above created parameters in the SQL as required.


STEP 8: Execute the Jmeter


Configure the Thread group with number of Threads. These value give the number of Vusers run concurrently. 

Please make sure these value does not exceed the pool configuration connection count 5(STEP 3)


Now you can observe the result of SQL in the 'View Results Tree' node.